Using Trim Wraps Will Really Personalize Your Fishing Rod
Trim wraps are a decorative thread pattern typically used around the edges of your guide wraps.
Ideally, you would use a contrasting nylon thread or metallic thread for this. For example, if you are using black guide wrap, then you may choose a red or gold thread for your trim wrap.
Also, trim wrap thread is typically size A thread. Size A gives the trim wrap a tight finish that almost looks like a solid color instead of threading (like if you used a larger size thread).
This is a personal preference and the only right or wrong is based on individual taste.

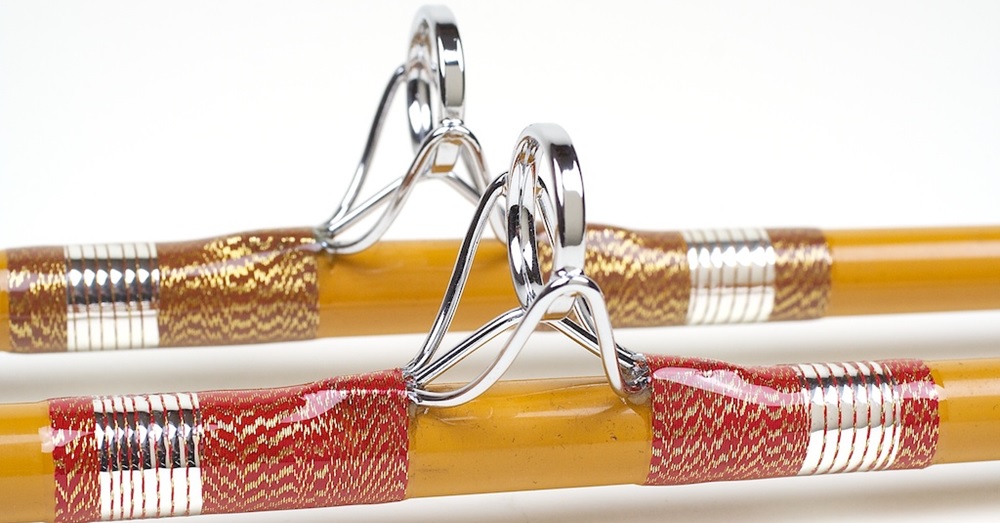
Personalize your fishing rod with trim wraps, in any color and texture combination you can think of.
How To Video At End Of Article!
Make Sure Your Have Your Supplies
Before you start a trim wrap, you will need a few tools handy to make life easier:
Small Diameter Tube – something like a stir straw, or even a round toothpick if that is all you have.
Masking Tape – to secure the small diameter tube to the rod blank.
Burnishing Tool – to help push the trim wrap tightly against the guide wraps.
Decorative Thread – typically you want to choose a color that contrasts the guide thread color.
Steps To Complete A Trim Wrap
Step 1- Start by placing the small tube several inches away from the point that you will want to place your trim wrap. You can use masking tape to temporarily secure the small tube on the rod.
Step 2 – Next, cut a piece of thread that you will be using for the trim wrap. Usually 8 to ten inches of thread will be enough, but if you are doing a large diameter fishing rod, you might need a longer piece.
The more wraps will result in a wider trim wrap. It is a personal taste – not a functional one.
Step 3 – With about two inches of the thread hanging down around the rod, press the thread against the tube and rod blank. Then, simply start hand wrapping the thread around the tube.
In the video example on this page, we wrap the thread around the tube and rod blank five times – but your mileage may vary. The more wraps will result in a wider trim wrap. It is really a personal taste – not a functional one.
Step 4 – After you have wrapped the thread around the number of times you want, take the end of the thread you used to wrap around the rod and pass it through the tunnel that was created by securing the small tube on top off the rod – and the thread you just wrapped around it. (The thread goes under the thread wrap).
Step 5 – Next, take the other end of the thread (that you have been holding), and pass it through the tunnel in the opposite direction. In other words, if you first wrapped the thread with your right hand – you first pass the thread through the tunnel right to left. Then take the thread end in your left hand, and pass it through the tunnel left to right.
Step 6 – Then take each of the thread ends and gently pull up together above the thread wrapped around the small tube and rod blank. This will pull the wraps together and slightly lifts it off the small tube.
Step 7 – Next, using your fingers, gently slide the wrapped thread off of the small tube and down the blank to where your trim wrap will be placed (in most cases the edge of the guide wrap).
Step 8 – Now grab each thread end with each hand, and gently pull in opposite directions. This will tighten the thread wrap around the rod blank.
Step 9 – Using your thread burnishing tool, push the trim wrap up against the guide wrap so it fits snug against it. This may take a few attempts to complete as you spin the rod around.
Step 10 – Then, pull both thread ends again to synch down the thread knot. At this point if a thread is out of place, just use the burnishing tool again to clean up any stragglers.
Be sure to place the razor on the rod, and pull the thread over the edge to cut, instead of a sawing motion
Step 11 – Then trim the thread ends off with a razor blade. Be sure to place the razor on the rod, and pull the thread over the edge to cut, instead of a sawing motion (which may screw up the knot and thread). If this does happen, just start over again.
You can make trim bands at any width you want, and repeat this process with as many colors and decorative threads you wish.
Usually trim wraps under 10 wraps can be terminated using this technique.
Trim wraps really add unique accents to a new or existing fishing rod – give it a try!

